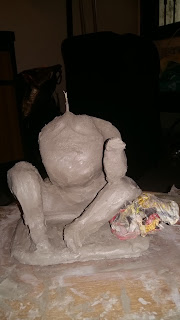
This year was a landmark in my bringing home the idol, since
I made it all by myself. I felt responsible doing my bit and though my son was
a bit sceptical if I will be able to make it, for me it was a zidd and I decided
big or small, however it turns out this is it, this time our Ganesha would be
the one I will make.
As I promised a couple of my friends and as mentioned in
the last post, I am listing out a couple of tips and procedure as to how I made
it. Of course being a ceramic stoneware potter made it that much more easier
for me. But don’t fret, it is not difficult at all and the rewards include a
heart that sings, deep creative satisfaction and of course the feeling of being
Parvati (mum to my baby Ganesha) that I cannot shake off. Makes the visarjan
that much more difficult but well even in there is a huge lesson of loving and letting go. Isn’t that
what life is all about anyways. Before I get into a philosophical tirade lets
just do this:
Material Required:
Shadu Clay (I got from Pune, but it should be available
in Mumbai too)
A knife not very sharp
A small tub to knead the clay (I got it in powder form)
A sponge
A cardboard
Try to begin the process when you have a couple of hours
in hand so that you complete the entire idol in 1 sitting. Cause if the clay is
at different stages of drying, chances of developing a crack are higher.
Step 1:
Knead the clay with water. This is a toughie, will make
some muscles for you. Knead it well and go on with it till you achieve a nice
smooth ball, almost like roti dough. Start with smaller amounts of water and go
on adding as you go.
Step 2:
Pull out enough quantity to roll it into a thick slab. Do the
entire process on a piece of wooden board and it will not stick as the wood
will absorb the wetness.
Step 3:
Roll out dough and start with shaping the bum and thighs
first, keep your fingers moist (not wet) and then add lower legs shaping it the
way you want to position them. I shaped one leg in crossed position and
supported it with a ball of newspaper. Newspaper will not stick to the clay,
you can use it to support the extremities.
When you are sticking 2 pieces of clay together you could
scratch both the surface a bit with the blunt knife and while sticking add paste of clay (wetter clay like fevicol consistency) and ensure that you press them in place stiffly. Keep wiping
off the extra wet clay with the help of a sponge. Once the shape is done, you can
create the crown, the halo, his jewelery, his drapes, go wild with your
imagination and adorn bappa with what you want.To remove small bumps and to finish it well take the sponge and squeeze all water out of it and give a good wipe to the idol.
Don’t dry the idol in direct fan or sun, let it dry
naturally covered with a clean cloth or a newspaper, it took 3 days for mine to
dry. And then I painted him with poster colours and voila, my baby was set to
rock my mandir.
The best was when my son approved and fell in love with the
idol, he was proud of his mommy and I was on the top of the world, really!
I wish you eco friendly Ganesha next year and the sheer joy
that comes with it. Craft it, it’s a feeling like none other.


This is fantastic Anubha!!!!Bappa bless you!!!
ReplyDeleteThis is the precise weblog for anybody who needs to seek out out about this topic. You notice so much its almost arduous to argue with you. You positively put a brand new spin on a subject that's been written about for years. Nice stuff, simply nice!
ReplyDeleteHey keep posting such good and meaningful articles.
ReplyDeleteAwesome work.Just wished to drop a comment and say i'm new your journal and adore what i'm reading.Thanks for the share
ReplyDelete